Adobe Illustrator is used for creating logos, graphics, cartoons and fonts.
Learning Illustrator
Shapes - Colors - Fonts - Brushes
1st Projects
Shape Robot
Colors Fill & Stroke Tool / Colors Live Paint / Gradients
Postcard / T-shirt Designs / Logo Design
Greeting Cards / Install & Package Fonts & Brushes / Text Mask

New to Illustrator? Watch all of the Adobe getting started videos.
Illustrator is not as user friendly as Photoshop.
Following the videos will teach you different ways to fill color, select and edit lines, draw, curve lines and text, and combine shapes.
You can even learn many experienced tricks such as working with free form gradients, create and apply patterns, warp, pose and sculpt your art works.

|

|

|
Adobe Illustrator is graphic-driven software used primarily for creating vector graphics.
Vector Graphics are infinitely scalable and take up less computer
memory than Raster Graphics (pixel based such as photos).
What is a Vector Graphic?
A vector graphic is the creation of digital images through a sequence of commands or mathematical statements that place lines and shapes in a given
two-dimensional or three-dimensional space.
In physics, a vector is a representation of both a quantity and
a direction at the same time.

|

|

|
Motorcycle, glass, and monster all drawn using adobe illustrator.
Hand in all projects as both an Illustrator file: ai & jpeg

Assignment: Shape Robot
Download the Adobe file Working with Shapes Tutorial and create the exact same robot building it out of shapes.
When done, change the color of the robot, use the star tool and add more than 6 points to your star, add other personal touches and convert a curved line into curved text.

There are two main ways to use color in Illustrator.
Option # 1.
Assigning a fill or stroke to the entire object.
Fill Tool
The Fill tool fills objects with color, patterns or gradients. When creating a single-colored fill object, it is the best tool to use. The Fill tool will fill all the area within the lines of an object, while remaining on that object's layer. Filled objects obey a stacking order when it comes to the layers palette, meaning the item that you're attempting to fill may not be the item you're actually filling. Select the layer for the object itself before attempting to fill the object.
Stroke Tool
The Stroke tool allows you to change the properties of a stroke used to create an object. This tool can change not only the color of the stroke, but also its sharpness, width and other properties. Strokes also utilize the layer palette and stacking order, so the same care must be taken when selecting stroke objects as with filled ones.
Using Fill and Stroke
To fill an object using the Fill and Stroke tools, start by drawing the object using the brushes and drawing tools of your choice. Select the drawn object with the Selection tool, and then select the Stroke tool and a color from the swatch. This will color the lines and strokes in the object. Then, select the Fill tool and pick a color from the swatch. Clicking inside the object will fill it with the selected color or pattern.
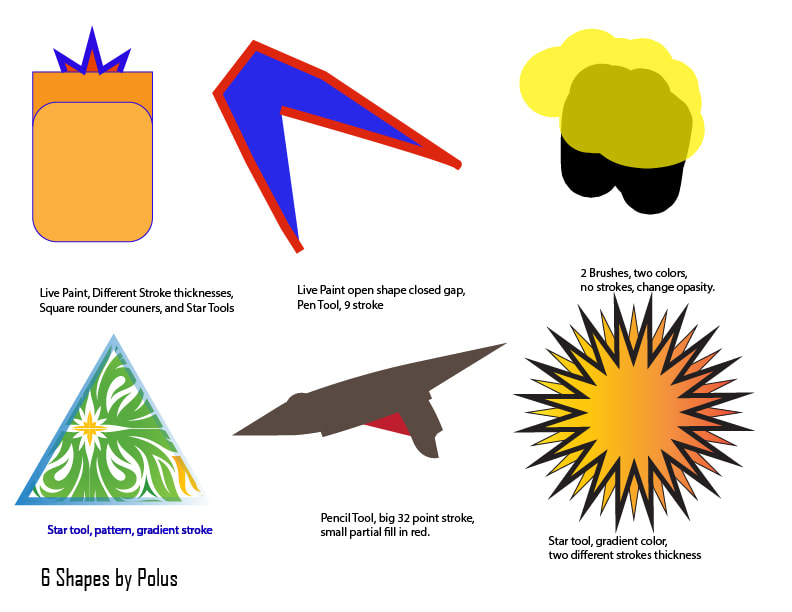
Assignment
6 Shapes
Watch "Using Color in Illustrator"
&
Watch "Live Paint Bucket Tool"
Then do the assignment below demonstrating your skills. Label your 6 shapes showing what varieties of Tools you used, which are the Live Bucket Fills, patterns, custom gradients, and a variety of stroke sizes.


Don't forget to label the shapes with 6 different legible fonts and note the
size of the stroke that you used.

Creating a Live Paint Object
There are two main ways to use color in Illustrator.
Option # 2
Convert object to a Live Paint Object
Live Paint Object
Live Paint objects differ from regular objects made with standard fills and strokes. Live Paint objects are strokes that have been grouped together and thus can be edited as a single flat object instead of a series of stacked layers. Live Paint objects can have multiple stroke colors and fill colors, making them more dynamic than regular objects.
To create and fill a Live Paint object, first draw the object with the brush or tools of your choice with no gaps. If you left any gaps use go to:
Object - Live Paint - Gap Options (to detect and fix gaps)
Then select all the objects sides with the Direct Selection Tool,
Use the Live Paint Selection Tool (Shift + L)
Shortcut - Press Shift + L - for Live Paint Select
Object - Live Paint - Make (K)
Shortcut - Press K - to Select the Live Paint Bucket tool
Live Paint Tool can also be found hidden under the shape builder tool.
The sections of this group that can be edited with the Bucket tool should be highlighted. Use the arrow keys on your keyboard to select a color from the three squares of color set above the Live Paint Bucket tool cursor. The center square displays the active color, and that color will be applied to the fill when you click the interior of an object. Each enclosed area on your object can be filled individually in this fashion, and each stroke edge can be re-colored.
How to create custom Gradients

Pen Tool
&
Paint Brush, Pencil & Blob Brush
Watch, learn and practice with the adobe videos and files.


Postcard transform, group and ungroup, align content, erase and cut work, using Adobe's video and practice file.
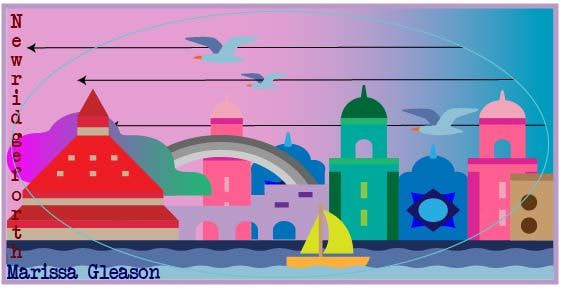
student redesign by Marissa Gleason
|

student redesign by Dante Sherman
|

San Francisco postcard by Magdalena Considine
Assignment: Postcard
Create your own Postcard of a city with a front and back using 2 Art-boards.
Create a, 4" x 6", 300 ppi, choose CYMK color mode, and choose 2 art boards when to create the front and back for your postcard.
When done save as both a working ai file and File-Export-Export As a Format: jpeg and check use art boards.
Hand in both jpegs and ai file.
Creative Fun Text for your Postcard Illustrator Text Basics | Adobe Illustrator tutorials Add and Reshape your Text using outlines and the Direct Selection Tool, make a city name, and add your name to your postcard.
Gradients, Color, and Arrow tools Illustrator Color Basics | Adobe Illustrator tutorials Make at least two large areas Gradients so I can clearly see them. Examples could be the sky, a large building or water.
Add an arrow or arrow tool to your postcard design.
Change colors of buildings and postcard to create your own color theme.
Group your building shapes together and then copy and resize the group making a second duplicate building in your image. You can resize the building to make the second one smaller to appear far away.
File – Export As… change to jpeg & then check use art boards!
Save a working ai file. Hand in both your Jpegs and Ai files.
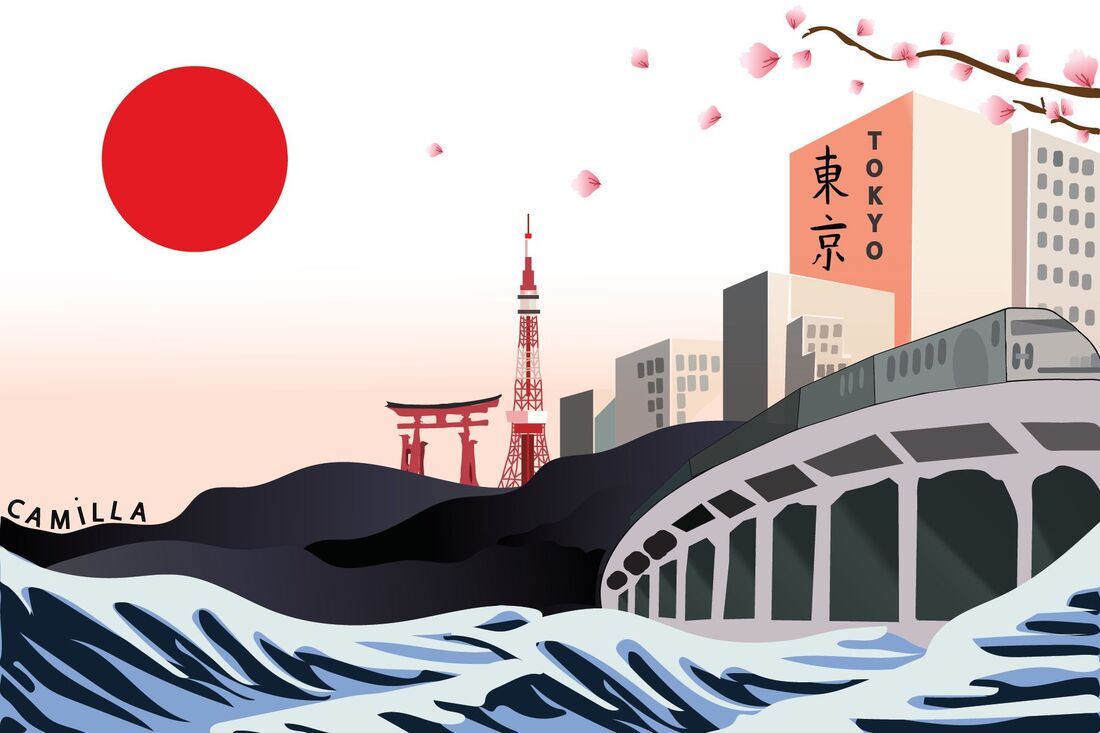
'Welcome to Tokyo'
by
Camilla Bartolone
Scholastic Silver Key - 2022
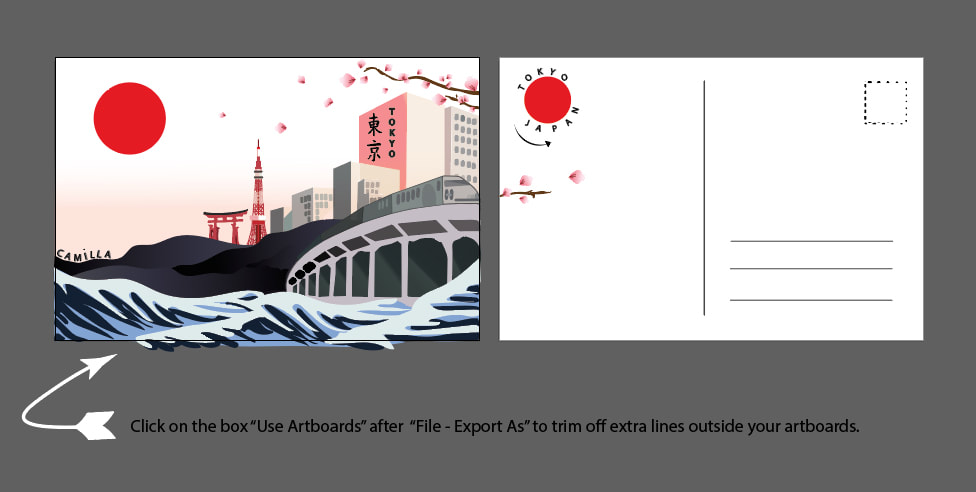
Save your ai file with both art boards like the one below. Then File - Export As change to jpeg and check the box Use Artboard to create your two jpegs that trim the pages to get rid of your extra lines outside your boards like the example below.
Want to create your postcard vertical? Just make sure the backside is done horizontally for the post office.
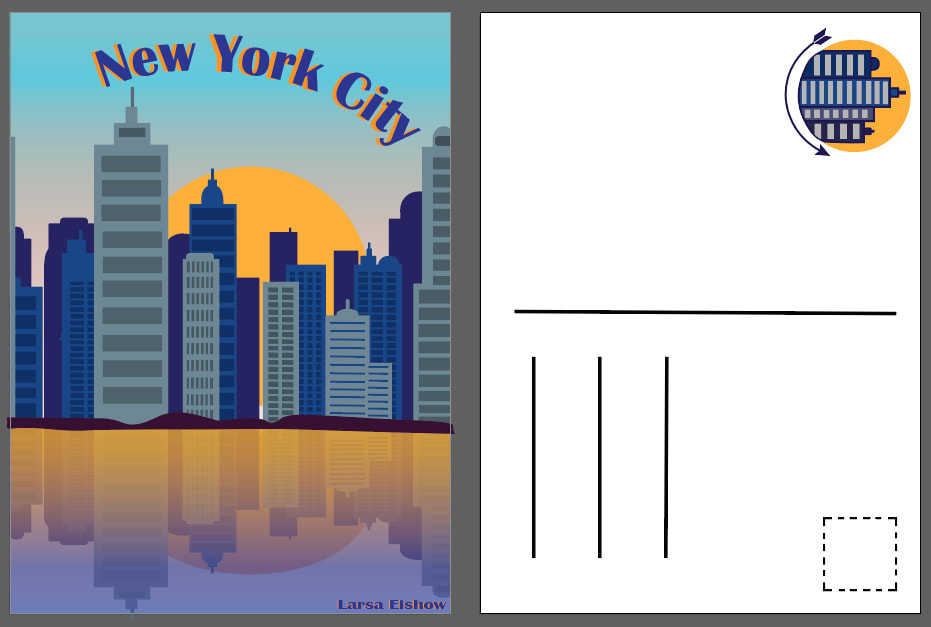
Postcard by Larsa Eishow
Postcard by Larsa Eishow
|

|
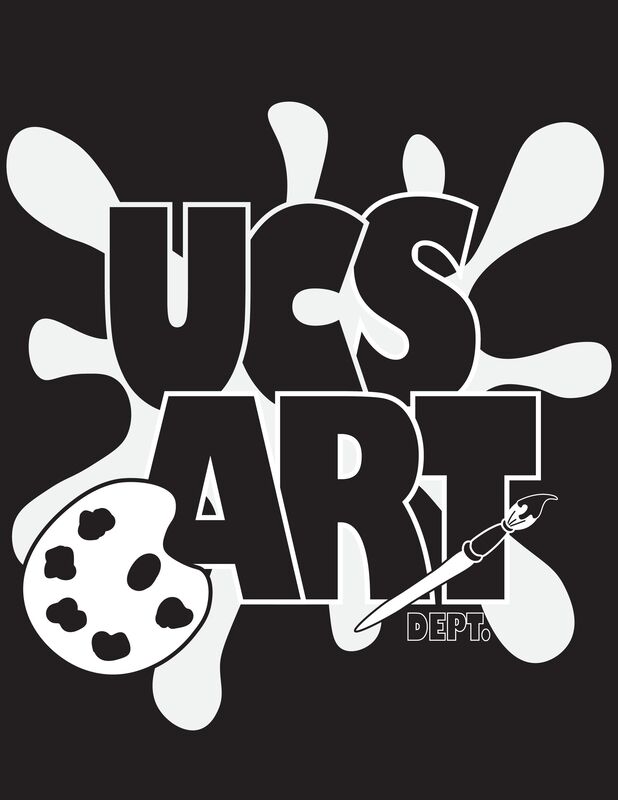
Two UCS Art Dept. designs by Larsa Eishow
|
One in black and white.
|
One in 2 colors + t-shirt color (white and purple + black t-shirt).
|
USC Art Dept. Design for a T-shirt
Create two UCS Art Department design that can be printed on the front of a t-shirt for:
Utica Community Schools Art Department (UCS Art Dept.)
or
Henry Ford II High School Art Department (HF2 Art Dept.)
or
National Art Honor Society (N.A.H.S.)
Create two of the same design. One all in black. One with two colors of ink.
Make sure you type or draw your text.
If handing in a project with fonts you installed, you need to "Package" the fonts and send me the font file so I can view them or print them.
We can order colored shirts and use up to two different colors of ink for the words and design. Please note the color of shirt to be printed on with the two colors of ink.
8 1/2" x 11" artboard
CMYK Color
300 ppi
Hand in both color and black and white jpeg & both Illustrator files (ai)
Or both illustrator artboard in the same file.
Total of 4 files

|

|
2019 Art Department design by Caitlyn S.
redrawn in illustrator by Rachel G.
2021 UCS Art Department design
by Magdalena Considine

2019 Winning HF II Art Design 2019
design by Christiana Z.
redrawn in Illustrator by Greg M.

2022 National Art Honor Society design
by Nola C.
White + Gray printed on Black hoodie

T-shirt design by Jacob G.
|

|

T-shirt design by Fiona B.
|
More two color student designs printed
Art Department T-shirts / Hoodies

|

|
Black and White Design + Color Design by Rawan K.
Design your own Company Logo
Create a logo for your own company.
Draw an object with at least five shapes.
Include your logo name or words.
Make sure it looks good in black and white and in color.
Submit both a black and white copy and a color copy as jpegs.
Colored ai file must also be submitted for your grade.
Logo Designs by: Kathryn L, Rachel G, Makenna D, Fiona B, Devon M, Nina V.
|
|

|
Create a Greeting Card
Create a front and inside to your card (two art boards).
Standard Size: 4.25" x 5.5", 300 ppi, CMYK color
Watch the Adobe videos:
Illustrator Image Effects Basics | Adobe Illustrator tutorials
1. Add Images
2. Understand Effects
3. Add Effects
4. Add Creative Brush Strokes
Add a “Creative Brush Stroke” an “Artistic Effect” and add your own hand drawn font to your Greeting Card. You may wish to add other fonts too.
If you install other fonts of brushes remember to File - Package in order to save and send the folder to me. If you add a photo or image remember to Embed the image.
Hand in your finished artwork as an .ai file and exported artboards as jpegs.

Greeting Card inside & outside designed by Sebrina Assaf

|

|
Greeting Card inside & outside by Fiona B.

|

|
Hand made Font, Greeting Card inside & outside designed by Rachel G.
Using a photo in Illustrator?
Don't forget to send me the Photo!
If using a photo, "embed" the photo and "file - package" your fonts, brushes and photo and hand in every file in the folder also add your jpeg that you create.
Make a jpeg by "file - export as" change format to jpeg.
You will have to send each file separately in Schoology.
Illustrator file.ai
Photo.jpeg
Brushes.abr
Fonts.ttf
You may have to email me the entire zip folder if something is too large for Schoology to accept it.

|

|
Happy Hall-O-Weenie from Mr. Palombo's Dogs
Package your Files and send them.
Otherwise, I can't see your work!
I need your fonts, brushes and images to view your work!
How to Export - Share - Package Files
Don't lose your Fonts!
Don't lose your Photographs!
Don't lose your mind or get a bad grade. It is easy to package files.
It is easy: Go to File - Package - make sure brushes, fonts, images are packaged.
Then copy the files from the "packaged" folder and send them to me through Schoology.

Looking for cool Illustrator or Photoshop fonts?
Try the website DaFont.com you can download them free
and use them here at school.
Search for free Vector fonts
You can download fonts in ".OTF," ".TFF," ".PFP," and ".TTF" formats.
Then right click on the file to open it and click install.
It will install it for you into Illustrator.


How to Install Brushes in Illustrator
Find Vector Brushes = .ai
Find Illustrator Brushes and download them they end in .ai
If they download into a .zip file click on them to unzip the file.
Under Properties in Illustrator
Click the brush menu – Then click on the brush library icon on the bottom left.
Then go down to “Other Library…”
Find your brush file in Downloads (it ends in .ai)
Free Illustrator Brushes may be found at various sites, search Illustrator or Vector brushes. Make sure the files end in .ai
Text Masks

|

|
How to Create a Text Mask using any of your photos.

|
|
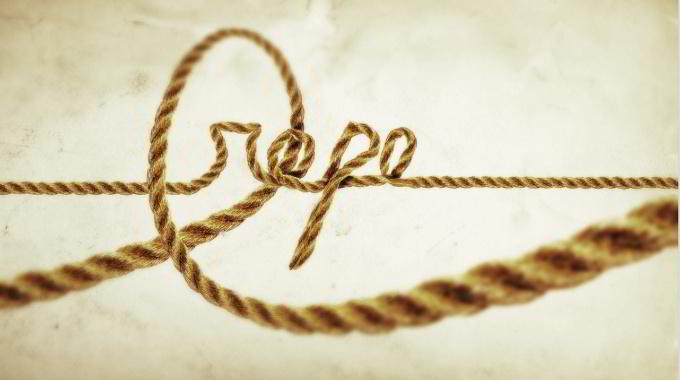

Honey Rope Sketch
Create Dramatic Text
Search for a specific text effect video using Illustrator and recreate the text style to use as an image of your main webpage.
Several Dramatic Text can also be made using Photoshop.
Search for others text effects you like on YouTube.

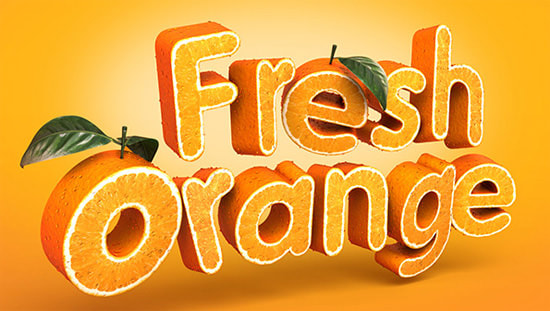

Neon Orange Fur
